Introduction To Kali and WiFi Pen Testing
How to Install Kali Linux
WEP Hacking
Kali Linux and Reaver
Getting a Handshake and a Data Capture, WPA Dictionary Attack
Using Aircrack and a Dictionary to Crack a WPA Data Capture
Cracking a WPA Capture with the GPU using HashCat
Creating a Dictionary / Wordlist with Crunch Part 8
Note: If you are using a updated version of Kali and aicrack-ng mon0interface has been changed to wlan0mon. Read here for more info.
Kali Linux and WEP Hacking
WEP is the original widely used encryption standard on routers. WEP is notoriously easy to hack. Even though WEP is rarely seen anymore it still does pop up every now and again.
Also this is a good place to start for someone new to wireless pen testing before moving on to WPA encryption.
Penetration Testing Setup
Setup a old router and log into it setting it up as WEP for wireless security to use as a test router. Have one other computer, tablet, or smartphone connected to it wirelessly since the encrypted data between the two will need to be captured.
The basic idea of this attack is to capture as much traffic as possible using airodump-ng. Each data packet has an associated three byte Initialization Vector called IV’s. After the attack is launched the goal is to get as many encrypted data packets or IV’s as possible then use aircrack-ng on the captured file and show the password.
At this point Kali Linux should be running along with the WEP encrypted router and a wireless connected device. Also a wireless USB adapter should be plugged in and ready.
Open a terminal window by pressing the terminal icon at the top left.

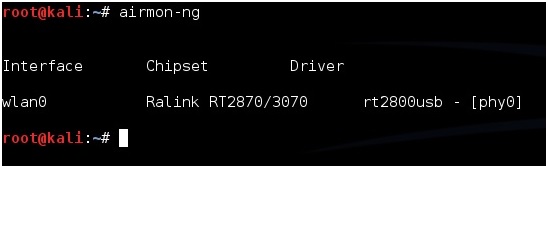
Next type in the command “airmon-ng” without the quotes to see if your adapter is seen by Kali Linux. It should show the interface, chipset, and driver. If it doesn’t then some troubleshooting will have to be done as to why the adapter is not seen.

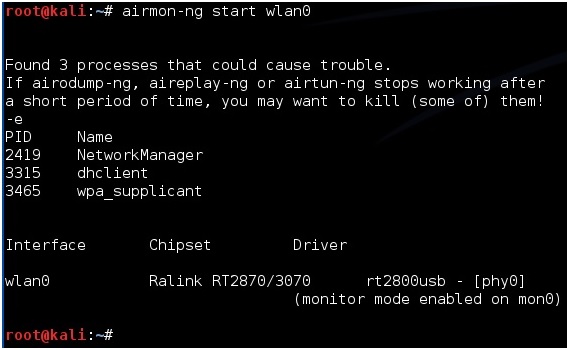
Next type in “airmon-ng start wlan0” to set the USB adapter into monitor mode.

Now we need to see what routers are out there and find the test router. To do this run the command “airodump-ng mon0”. After this command is run a screen will come up showing the routers in range and there information.
(If a adapter comes up enabled on mon1 or mon2 simply used that instead of mon0)

The test machine that was setup should be seen along with its information. The information needed will be the BSSID, channel (CH), and ESSID. The test machine here is the dlink router with the BSSID: 00:26:5A:F2:57:2B the channel is on 6 and the ESSID is dlink.
Once this information is seen don’t close the terminal window press CTRL+C inside the window to stop it from using the USB adapter and leave it to refer back to.
Open another terminal window to run the next command. Also when done this way the BSSID can be simply copied and pasted when needed.
Next the WEP encrypted data packets needs to be captured. To do this the airodump-ng command is used along with some switches and information collected.
For me this would be:
airodump-ng -w dlink -c 6 –bssid 00:26:5A:F2:57:2B mon0
airodump-ng is the command, -w is a switch saying to write a file called dlink to the drive, -c is a switch saying the target is on channel 6, –bssid is another switch saying which bssid to use, and finally mon0 is the command to use the USB adapter enabled on mon0.
Change the file name, channel, and bssid to match your test router. Copy the information from the first terminal window. Copy and pasting the BSSID into the new terminal window is much quicker then typing it for most.
airodump-ng -w (ESSID) -c (channel) –bssid (BSSID) mon0


After this is done correctly a window will come up and show information about the target router. The main feedback we need to watch is the Beacons and the Data.

These numbers will start at zero and grow as traffic is passed between the router and another device. As these numbers grow, they are being captured in the file specified in the previous command for this example it would be a file named “dink”. IV’s need to grow big to crack the password usually at least 20,000 plus, but ideally 100,000 plus. At this point someone can simply wait for the IV’s to grow large enough to crack the password, but there is a way to speed things up.
To speed up the IV’s open a third terminal window letting the second run capturing the data. In the new terminal window the aireplay-ng command will be used in a two part process first use the command “aireplay-ng -1 0 -a (BSSID) mon0”. So for this example it would be aireplay-ng -1 0 -a 00:26:5A:F2:57:2B mon0

After this run the command “airplay-ng -3 -b (BSSID) mon0” for this example it would be the following:
aireplay-ng -3 -b 00:26:5A:F2:57:2B mon0

This will begin sending out ARP request and the data and the beacons should begin to grow quickly. Again speeding up the capturing of the IV’s is not necessary but handy.
Aircrack-ng will be used on the data file being written to with the information. Aircrack-ng can be run at anytime even when there is not enough data captured it will say on the screen it needs more if there is not enough.
To use aircrack-ng we need the data file being written to the hard drive. In this example it is dlink. Open a new terminal window and type the command “ls” to see the file. The one aircrack-ng needs is the .CAP file here it is called “dlink-01.cap”.

To start aircrack-ng run the command “aircrack-ng (file name)” so here that would be
aircrack-ng dlink-01.cap

Aircrack will begin to run and start to crack the password. Here is what is what it looks like when it is done.

After “Key Found” it shows the password in hexadecimal or ASCII they are the same and either one can be used. For this example the password on the router was 12345.
How to Install Kali Linux
WEP Hacking
Kali Linux and Reaver
Getting a Handshake and a Data Capture, WPA Dictionary Attack
Using Aircrack and a Dictionary to Crack a WPA Data Capture
Cracking a WPA Capture with the GPU using HashCat
Creating a Dictionary / Wordlist with Crunch Part 8
Note: If you are using a updated version of Kali and aicrack-ng mon0interface has been changed to wlan0mon. Read here for more info.
Kali Linux and WEP Hacking
WEP is the original widely used encryption standard on routers. WEP is notoriously easy to hack. Even though WEP is rarely seen anymore it still does pop up every now and again.
Also this is a good place to start for someone new to wireless pen testing before moving on to WPA encryption.
Penetration Testing Setup
Setup a old router and log into it setting it up as WEP for wireless security to use as a test router. Have one other computer, tablet, or smartphone connected to it wirelessly since the encrypted data between the two will need to be captured.
The basic idea of this attack is to capture as much traffic as possible using airodump-ng. Each data packet has an associated three byte Initialization Vector called IV’s. After the attack is launched the goal is to get as many encrypted data packets or IV’s as possible then use aircrack-ng on the captured file and show the password.
At this point Kali Linux should be running along with the WEP encrypted router and a wireless connected device. Also a wireless USB adapter should be plugged in and ready.
Open a terminal window by pressing the terminal icon at the top left.
Next type in the command “airmon-ng” without the quotes to see if your adapter is seen by Kali Linux. It should show the interface, chipset, and driver. If it doesn’t then some troubleshooting will have to be done as to why the adapter is not seen.
Next type in “airmon-ng start wlan0” to set the USB adapter into monitor mode.
Now we need to see what routers are out there and find the test router. To do this run the command “airodump-ng mon0”. After this command is run a screen will come up showing the routers in range and there information.
(If a adapter comes up enabled on mon1 or mon2 simply used that instead of mon0)
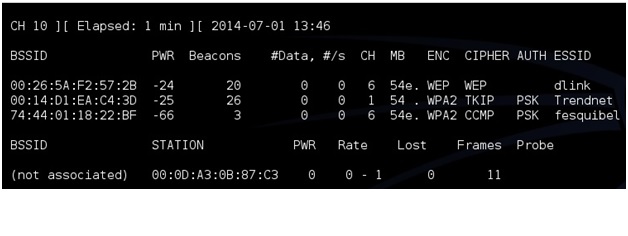
The test machine that was setup should be seen along with its information. The information needed will be the BSSID, channel (CH), and ESSID. The test machine here is the dlink router with the BSSID: 00:26:5A:F2:57:2B the channel is on 6 and the ESSID is dlink.
Once this information is seen don’t close the terminal window press CTRL+C inside the window to stop it from using the USB adapter and leave it to refer back to.
Open another terminal window to run the next command. Also when done this way the BSSID can be simply copied and pasted when needed.
Next the WEP encrypted data packets needs to be captured. To do this the airodump-ng command is used along with some switches and information collected.
For me this would be:
airodump-ng -w dlink -c 6 –bssid 00:26:5A:F2:57:2B mon0
airodump-ng is the command, -w is a switch saying to write a file called dlink to the drive, -c is a switch saying the target is on channel 6, –bssid is another switch saying which bssid to use, and finally mon0 is the command to use the USB adapter enabled on mon0.
Change the file name, channel, and bssid to match your test router. Copy the information from the first terminal window. Copy and pasting the BSSID into the new terminal window is much quicker then typing it for most.
airodump-ng -w (ESSID) -c (channel) –bssid (BSSID) mon0


After this is done correctly a window will come up and show information about the target router. The main feedback we need to watch is the Beacons and the Data.

These numbers will start at zero and grow as traffic is passed between the router and another device. As these numbers grow, they are being captured in the file specified in the previous command for this example it would be a file named “dink”. IV’s need to grow big to crack the password usually at least 20,000 plus, but ideally 100,000 plus. At this point someone can simply wait for the IV’s to grow large enough to crack the password, but there is a way to speed things up.
To speed up the IV’s open a third terminal window letting the second run capturing the data. In the new terminal window the aireplay-ng command will be used in a two part process first use the command “aireplay-ng -1 0 -a (BSSID) mon0”. So for this example it would be aireplay-ng -1 0 -a 00:26:5A:F2:57:2B mon0

After this run the command “airplay-ng -3 -b (BSSID) mon0” for this example it would be the following:
aireplay-ng -3 -b 00:26:5A:F2:57:2B mon0
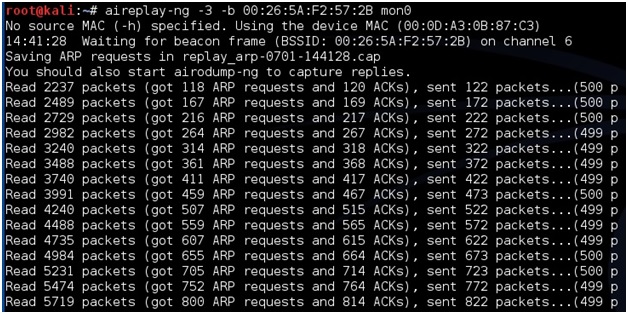
This will begin sending out ARP request and the data and the beacons should begin to grow quickly. Again speeding up the capturing of the IV’s is not necessary but handy.
Aircrack-ng will be used on the data file being written to with the information. Aircrack-ng can be run at anytime even when there is not enough data captured it will say on the screen it needs more if there is not enough.
To use aircrack-ng we need the data file being written to the hard drive. In this example it is dlink. Open a new terminal window and type the command “ls” to see the file. The one aircrack-ng needs is the .CAP file here it is called “dlink-01.cap”.

To start aircrack-ng run the command “aircrack-ng (file name)” so here that would be
aircrack-ng dlink-01.cap

Aircrack will begin to run and start to crack the password. Here is what is what it looks like when it is done.
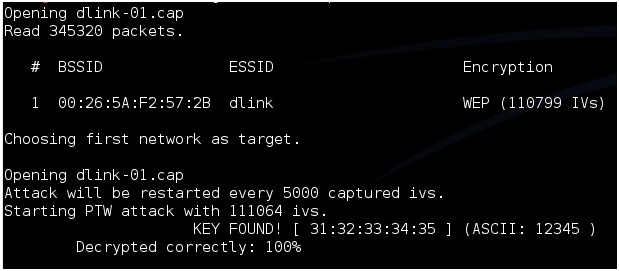
After “Key Found” it shows the password in hexadecimal or ASCII they are the same and either one can be used. For this example the password on the router was 12345.
NEXT : Kali Linux and Reaver

No comments:
Post a Comment